Klynke Quick Guide
Welcome to Klynke, your secure, intuitive time tracking and project management solution built for Microsoft 365 and Teams. This guide provides step-by-step instructions to help individuals and teams log time, manage tasks, and streamline workflows with confidence.
Whether you're an IT admin configuring integrations, a project manager overseeing deliverables, or an employee logging hours, this guide covers the essentials. For advanced setup, reporting, and role-based controls, see the Admin Guide
Navigating This Guide
Use the In-Page Menu below to jump directly to the section you need. This structure ensures efficient navigation and minimizes time spent searching for information.
How to Track Time in Klynke
Fast, frictionless time logging from your My Work dashboard.
1. Open the “My Work” Tab
Your personal dashboard for all time entries.
2. Select a Date
Use the calendar picker or click directly in the week view.

3. Click the Green “+” Icon
Launches the “Add Work” dialog for entering time.

4. Enter Your Work Details
-
Input hours and minutes
-
Add a description (optional but useful for context)
-
Click Register to save
✅ Your entry appears instantly in the calendar view.
Classify Time Entries for Better Insights
Use Task Type and Billing categories to organize time, supporting better project oversight, how you spent your time, and billing accuracy.
Task Type
Label entries by activity (e.g., meetings, events, development, support). Helps teams analyze time distribution and optimize planning.
Billing
Assign billable vs. non-billable categories or client-specific tags. These can be customized to reflect your organization’s structure or individual customers. Supports invoicing, cost recovery, and budget tracking.
💡 Admins can customize classification options to match your organization’s structure. For setup, see the Admin Guide


Link Time to Projects and Tasks
Connect time entries to Klynke Projects and Microsoft Planner tasks.


-
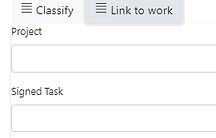
Click “Link to Work”
(A dialog box appears, see above.) -
Select a project from your project list
-
(Optional) Choose a specific task—only tasks assigned to you will appear.
Log Time from Outlook Calendar Events
Seamless integration with Microsoft Outlook.
By default, Klynke connects to your personal Microsoft Outlook Calendar. However, you can also select any shared calendar you have access to, making it easy to track time across teams and projects.
To log time from a calendar event:
• Click the green “+” next to any calendar event.
• Klynke auto-fills the event details into your My Work tab.
• Entries are marked with a check for easy identification.
💡 Supports personal and shared calendars for cross-team tracking.
Use Drag and Drop for Recurring Tasks
Save time by reusing previous entries.
Drag past tasks onto your calendar for recurring meetings, weekly check-ins, or repeated work. Ideal for consistent routines.
Watch this quick demo:
Timesheets. Filter, Export and Visualize Hours
Klynke’s Timesheet feature provides a structured overview of your working hours, with customizable filters and export options to support reporting, payroll, and performance analysis.
Overview and Filters
• Apply customizeable filters by project, date range, or task type:

Role-Based Access ensures data privacy:
Access to timesheet data is determined by user roles:
Employee: View own entries only.
Project Manager: View entries related to assigned projects.
Admin/Team Owner: Full team visibility.
Customize Your View
-
Hide or rearrange columns for a personalized layout
-
Export to Excel with branded layouts
-
Add your company logo
-
Rearrange columns for personalized views
For setup assistance, contact your Klynke Administrator.
Timesheet Charts
Visualize your time data with dynamic charts that reflect hours worked over a selected period.

📈 Charts auto-update based on filters, offering visual insights into productivity.
Project Management in Klynke
Get started by creating your first project with Klynke’s simple and intuitive project management tool.
Create and Manage Projects

Click “Create new project” and choose from five project types:

-
Team project
(creates Teams channel + Planner plan). -
Reference project
Mirrors external tools (e.g., MS Project). -
Confidential project
(Restricted access; manual member assignment). -
From existing channel
Convert a Teams channel into a Klynke project. -
From existing group
Converts legacy Office 365 groups into projects.
Klynke Projects
Click on a project number. Each project workspace includes::
• Task List
• Documents
• Team Members
• Estimated vs. Actual Time comparison

Time Tracking on Planner Tasks
Three flexible methods to log time:
1. From My Work tab using "Link to Work"
2. Directly in Project View
3. From the Task List (auto-selects project/task)
Compare Estimated vs. Actual Time
Monitor progress and stay aligned with deadlines.
Open any project to view a visual comparison of planned vs. logged hours. Helps teams stay on track and adjust workloads.

Approval Workflow
Multi-level review for accountability and accuracy
Klynke’s approval workflow ensures accountability and accuracy in time tracking. The process includes up to five levels of approval, each tailored to organizational roles.
Approval is disabled by default and must be enabled by your Klynke Administrator.
Recall & Edit
Users can recall entries unless they’ve been approved by a higher-level approver.
Locking & Overwriting
Once approved at a higher level, entries are locked and cannot be edited. Final approval ensures data integrity.
How to Use the Approval Process
1. Initiate: Go to the Timesheet tab and click “Open Approval Process”
2. Select Entries: Use checkboxes to approve or disapprove time entries
3. Confirm: Click “Approve Selection” and confirm via dialog box
4. Lock Entries: Approved entries are locked and marked with a check
5. Export: Choose to export only approved hours to Excel
Need Help?
Reach out to your Klynke Administrator or contact support for assistance.
