Customize Timesheet
Klynke Timesheets
Klynke provides two types of timesheets:
Standard Timesheet
The Standard Timesheet is the default timesheet format. A Klynke Administrator can configure which predefined columns are available, and users can choose which columns to display or hide according to their needs.
If you want to add your company logo to the Standard Timesheet, follow the instructions in Configure Standard Timesheet below.
Custom Timesheet
The Custom Timesheet allows you to create an Excel-based timesheet tailored to your organization's requirements. You can customize the layout, add fields, use your company colors and fonts, include your company logo, and add other relevant information.
The Klynke Administrator creates and manages the available custom templates. Follow the instructions in Configure Custom Timesheet below.
Note
As a Klynke Administrator, you choose which timesheet format to use and configure the available options for your organization.
Once a custom template has been created and added to Klynke, you can select it as the default timesheet template for the organization.
Configure Standard Timesheet
Go to Configure in the main Klynke menu and select Timesheet.
From here, you can configure the Standard Timesheet and select the columns that should be available to users.
If you want to add a company logo, we recommend using a JPG or PNG image approximately 300 × 150 pixels.
Once you have adjusted the settings, confirm your changes.
The configured settings will then be available to users when they use the Standard Timesheet.
Configure Custom Timesheet
Custom Timesheets are designed in Excel and provide greater flexibility than the Standard Timesheet. You can customize fonts, styles, colors, images, print orientation, and other formatting to match your organization's requirements and branding.
Create a Custom Timesheet
Follow these steps:
-
Create a new Excel workbook or worksheet for your timesheet.
-
Design the timesheet using your preferred text, styles, colors, images, and print settings.
-
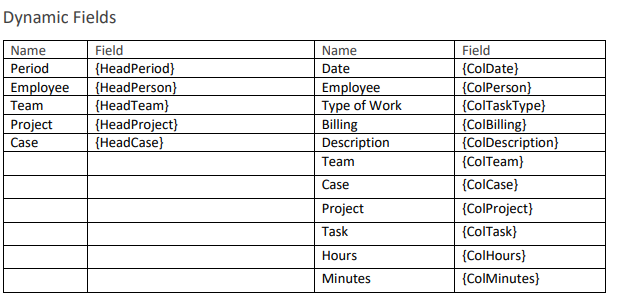
Insert the required fields from the Dynamic Fields table.
-
Save the completed Excel template.
-
Add the template to the Template list in Klynke.
-
Select the template and confirm it as your preferred timesheet format.
Dynamic Fields in the Excel Timesheet Template
Dynamic fields allow Klynke to insert the relevant time and project data into your Excel template when the timesheet is exported.
Insert the required dynamic fields into your template using the field names provided in the Dynamic Fields table. When the timesheet is exported, Klynke replaces each field with the corresponding data.
Field Placement
For clarity, dynamic fields are divided into two types:
Fields beginning with Head
These fields can be placed anywhere in the template.
Fields beginning with Col
These fields are expected to be placed within the same row.
Make sure the dynamic fields are entered exactly as specified. This allows Klynke to identify and replace them correctly when generating the Excel export.
Dynamic Field Table
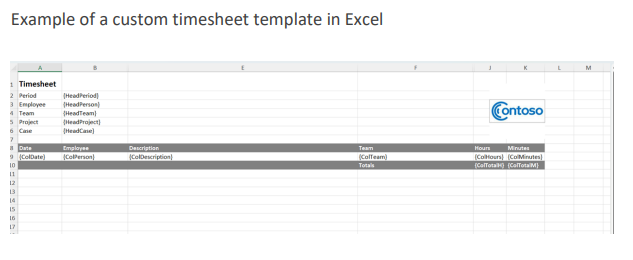
Example Timesheet